Methods
References
World Cafe: http://www.theworldcafe.com/
Images source: http://www.theworldcafe.com/tools-store/hosting-tool-kit/image-bank/book-images/
Methods
Getting to know each other
Icebreakers are activities and games that help the trainees get to know each other and warm up the conversation within the group. Such activities can also be used to open or reinforce the topic of the training. Including such activities ensures your trainees are engaged and enjoying the session, as well as devleoping a sense of ownership over the learning and learning environment.
Icebreakers and getting to know each other activities are generally used at the beginning of the session/training. They can be both complex stand-alone activities and simple and shorter activities used as small building blocks in your session’s design. They can be complex or simple, bigger stand-alone activities or smaller blocked activities, worked into the design of the session.
They allow you to:
- Create a safe space where participants feel comfortable and communication is open.
- Help participants who don’t know each other be introduced and start communicating in a simple and comfortable way.
- Assist the discovery of commonalities and shared interests between trainees.
- Foster equal participation in the session by all learners (particularly if they come from the same company and have different positions in the organization's hierarchy).
- Warm up the room and start the conversation about the session’s topic.
Allow participants to share their expertise and prior knowledge on the topic at hand.
Trading cards
Reference:
Gray, D., Brown S. and Macanufo, J. (2010). Gamestorming: A Playbook for Innovators, Rulebreakers, and Changemakers, p. 130-131.
Objective
To learn names and get to know the other trainees in the group. This icebreaker allows people to: self-define; get a glimpse of each other’s personalities outside of formal presentations; meet multiple people; create memorable visuals that spark conversations during the process; and bond within the group.
Number of learners: Unlimited
Duration: 15 minutes
Materials:
- Index cards or A5 papers
- Markers
Description
- Ask participants to create a personal “trading card”—one that includes a self-portrait, a nickname for the player, and one thing about themselves that people in the room aren’t likely to know.
- Have the participants pass the trading cards around in no particular order or manner. Tell them to read each card that falls into their hands and hold onto one they would like to ask a question about. They can keep passing until they find the one.
- Ask for volunteers to read the card they hold and to ask that person the question related to the little-known fact on the card.
- Let the participant/owner of the card answer and elaborate on the question they are asked. The person can then opt to ask the participant whose card they are holding a question or decide to pass. In the last case, request another volunteer to read from their card and ask a question.
- Keep going around until the participants appear to be sufficiently warmed up. Try to keep the play at a maximum of fifteen minutes.
Online adaptation
Description
- Ask participants to create a personal “trading card”—one that includes a picture, nickname, general background, and one thing about themselves that people aren’t likely to know.
- Have the participants upload the trading cards in a shared folder in a cloud-based document storage or online collaborative tool (e.g. Google Drive). Tell them to read each card and ask at least one question to another person by posting a comment on their card. They can ask more than one if they would like to.
- Give participants time to answer and elaborate on the questions they were asked and reply to the received comments.
- Make sure the shared folder with all the “trading cards”, including all questions and answers, is always available. Refer to them in future (e.g. when there is a group task and you need them to get to know each other further), if possible.
The speed meeting
Objective
For participants to meet each other quickly, learn names and get to know each other. In case trainees already know each other, this exercise can be adapted by simply changing the questions to build stronger connections. This method allows shy participants to get engaged and feel like part of the group too. It can also be used to start a conversation regarding the topic of the session.
Number of learners: 10 to 40
Duration: 45 minutes
Materials:
- Chairs
- PC
- Projector
Description
- Position as many chairs as participants in two circles (one internal and one external). Each circle will be composed of half the number of chairs as the total number of people. Each chair will face another from the opposite circle.
- Ask trainees to number off by one and two; half of the participants will now be ones and the second half twos.
- Invite the number ones to sit in the internal circle of chairs and explain to them that during the activity they won’t be changing chairs.
- Invite the number twos to sit in the external circle of chairs and inform them that at the end of each round (marked by a bell, buzzer or a clear sound) they will rotate one chair to their right.
- Inform participants that they now have the opportunity to meet their colleagues. In each round they can briefly introduce themselves and then discuss the question provided in each round. Each round will last three minutes.
- Let participants rotate until they have met at least half of the people in the opposite circle.
For each rotation make sure to have a question ready (the best way would be to project it on a screen).
- Participants who don’t know each other
- Participants who know each other
- Examples of topic-related questions in a session on soft skills in negotiation
- What do you do for a living?
- What do you like about your job?
- What is one hobby you enjoy?
- If you could talk to anybody in the world, dead or alive, who would it be and why?
- Why did you attend the training session?
- Share one thing about yourself that you think your colleague doesn’t know.
- What is your favorite movie and why?
- If you could talk to anybody in the world, dead or alive, who would it be and why?
- What are three things that are very important to you in life?
- What do you expect from participating in the training session?
- What is important to you in a negotiation?
- What is one strength that you have when negotiating?
- How do you prepare for a negotiation?
- What do you find challenging when negotiating?
Low-tech Social Network
Reference:
(2010), Dave Gray, Sunni Brown, James Macanufo. Gamestorming: A Playbook for Innovators, Rulebreakers, and Changemakers, p. 105-106.
Objective: Introduce each other, learn names and explore shared interests and expertise. Create a space to build connections through shared expertise and backgrounds of group members.[AM1]
Number of participants: 8 - 30
Duration: 30 - 45 minutes. The network can remain on the wall for the all duration of the training, maybe added to, updated or studied throughout.
Materials:
- Flipchart paper
- Markers
- Sticky notes
- Masking tape
Description:
- Give all players access to flipchart paper, markers and sticky notes.
- Tell participants that as a group they will build the social network of the people in the room. Invite participants to create on A5 or A4 papers (depending on the wall space that you have available and the number of participants) their avatars, a card with a self-portrait, their name and a motto.
- Invite participant to stick their cards to the wall, uploading them to the social network.
- Once all profiles are uploaded in the network, invite participants to introduce themselves to the other member of the group freely and share about themselves and their professional expertise. Every time they find a relevant connection to another member of the group, tell them to come back to the social network wall and draw a line to connect their two profiles with masking tape. They can label the connection by stating what they have in common.
- When the network has been created, take some time to look at it with all participants and explore the group background, expertise and profile.
World Cafè
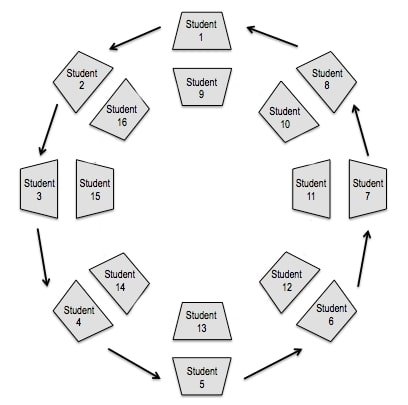
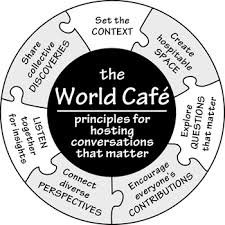
World Café is a method that fosters group dialogue, sharing of knowledge and experience, and group wisdom mapping. It is a simple and flexible method that can be used with all group sizes, even large groups.

World Café is a process in which people rotate in groups on different discussion topics, sharing their opinions, understandings and knowledge. The trainer chooses the topics in correlation with the learning objectives. Each participant gets to discuss each topic and contribute to/add on to what other groups have already jotted down. At the end, the discussion results will be shared with the whole group.


How to and why use World Cafè?
The World Café was not created as a training method, but it can be used successfully to foster participatory learning processes. For example, it can be used to:
- Engage participants in the exploration of a certain concept/technique/issue/or challenge, either new or familiar.
- Explore a topic from multiple perspectives.
- Create a common understanding and alignment within the training group.
- Foster the sharing of participants’ experience in dealing with a certain challenge, in solving problems or in performing their jobs.
- Support participants to have collaborative dialogue.
- Explore constructive possibilities for action.
- Support participants in exploring how to apply what they have learned during the training in their workplace.
How to design and facilitate a World Cafè
- Clarify the purpose
- Set up the environment
- Welcome participants
- Small Group Discussion Rounds
- Questions/Topics for Discussion
- Encourage Everyone's Contribution
- Harvest and share
The purpose of the World Café will be linked to the training’s learning objectives. Having a clear purpose enables you to consider what parameters need to be set for the activity to achieve it.
Use different table “stations” with chairs around (4 – 5 chairs/table is the optimal number), equipped with flipchart paper (or paper tablecloths on which participants can write) and markers. Make sure the environment is comfortable, allowing participants to move around and inducing a relaxed yet active atmosphere. As the name suggests, the method builds on meaningful conversations people usually have in informal contexts, such as a café.
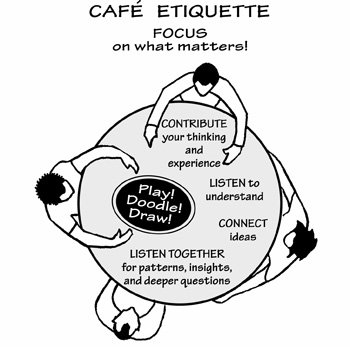
Introduce the method and process, topics of discussion, as well as some elements of “Café Etiquette”:
- Focus on the core issues—what matters?
- Contribute your thinking
- Speak your mind and heart
- Listen to understand others
- Link and connect ideas
- Listen together for further insight and questions
Play, doodle and draw—writing on the tablecloths/paper on the table are encouraged!
You can choose how many topic/discussion rounds you would like to have, but 4 – 5 rounds is usually a good number. People start at a certain table, sitting and discussing a certain topic for a certain amount of time. These are all variables that you can adapt to your own learning objectives, training context, time and space constraints. Around 15 to 20-minutes per discussion table allows for groups to deepen their conversation. At the end of the allocated time, each member of the group moves to a new table. They may or may not choose to leave one person as the “table host” for the next round, who welcomes the next group and briefly fills them in on what happened in the previous round.
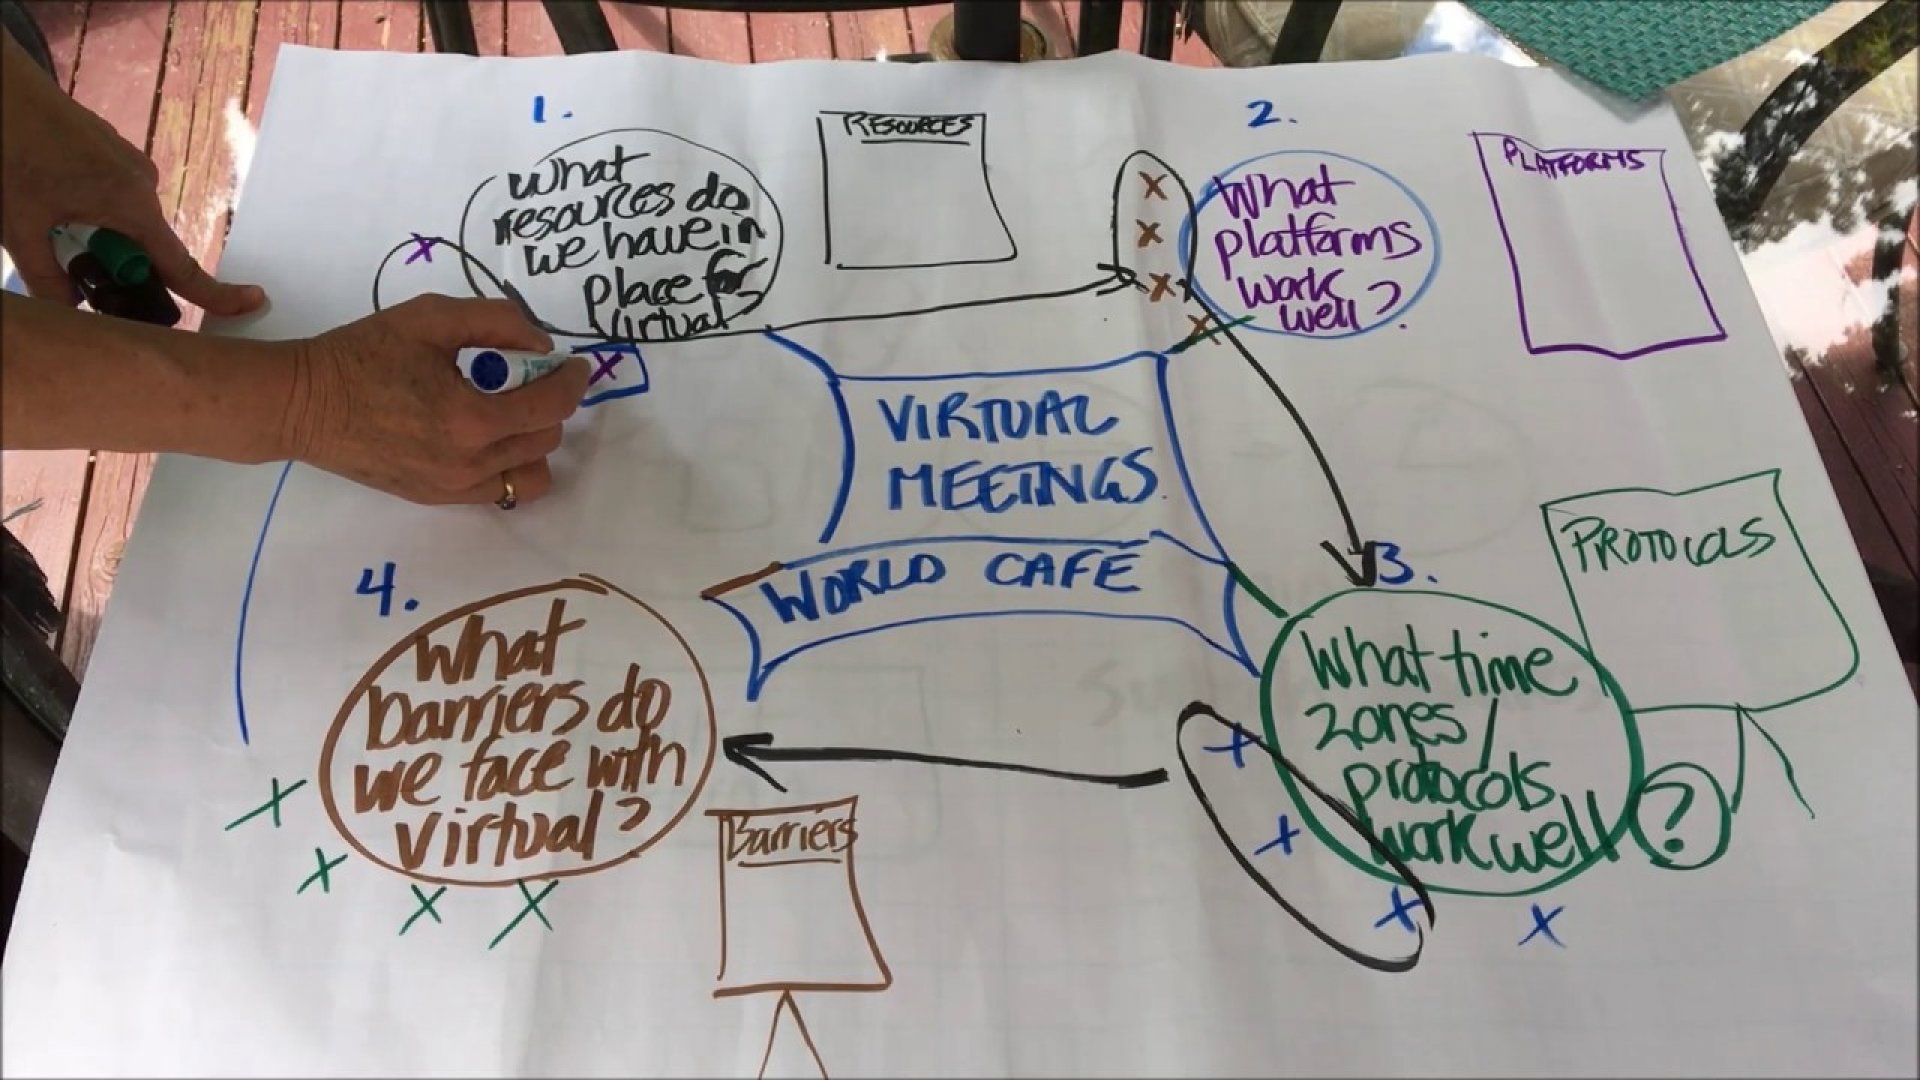
You may choose to have different questions at each table or explore the same question at all tables and invite participants to build on what is discussed already. Choose the format that is most relevant to your learning objective.
It is important for participants to understand that they are the ones building the discussion results with their ideas and perspectives, while at the same time actively listening and building on each other’s input. Make sure participants have the opportunity to move around during the session, meet and talk to new people, contribute new ideas to areas of interest, and link discoveries to widening circles of thought.
The discussion results will be recorded at each table as people come and go and will be shared with the whole group at the end of the conversations. Encourage both table hosts and members to write, doodle and draw key ideas on their tablecloths/flipchart paper or to note key ideas on large index cards or placemats in the center of the group.
How to Use the World Cafe in the EBMOs Core Areas?
Based on the PPT of IN-HOUSE TRAINING ON: NEGOTIATION SKILLS FOR COLLECTIVE BARGAINING, NATIONAL HEALTH INSURANCE MANAGEMENT & TUGHE REPRESENTATIVES
Based on NECA Effective Management of Conflict in the Workplace - the Role and Responsibilities of Union and Management (1)
Based on IN-HOUSE TRAINING ON: OVERVIEW OF LABOUR LAWS FOR JTI OFFICIALS, Tanzania
Based on IN-HOUSE TRAINING ON: OVERVIEW OF LABOUR LAWS FOR JTI OFFICIALS, Tanzania
Brainstorming
Brainstorming is a method by which ideas are proposed, shared and collected within a group. This method can be used to generate new ideas and solutions around a specific topic or issue, or to assess and share knowledge possessed by the group. People are invited to think and contribute freely. Judgement is deferred and all the ideas are noted down without criticism. After the brainstorming session, the contributions are evaluated or benchmarked.
Tips for Using the Brainstorming Method:
- Give people some time to think about your question on their own.
- Allow everyone to talk openly without structure.
- Make sure everyone shares at least one idea.
- Focus on the quantity of ideas and record every contribution on a flipchart.
- Use visuals to track all contribution.
- Give a specific time for the brainstorming to take place and inform participants about the time they will have.
Brainstorming can be used in different ways. Below are some examples.
Number of learners: 2 to 30
Duration: 15 minutes to 1 hour
Materials:
- Flipchart paper
- Markers
Description:
- Ask the group a question on a domain of interest or an issue.
- Invite participants to reflect upon the posed question and think about possible definitions, solutions or ideas.
- Invite participants to share freely and record every contribution on flipchart paper.
- Cluster the contributions and then open up discussion within the group of learners on the proposed ideas.
- Benchmark the information collected to available definitions and concepts OR elaborate with the group possible solutions based on the proposed ideas.
Number of learners: 20+
Duration: 15 minutes to 1 hour
Materials:
- Flipchart paper
- Markers
- Sticky notes
Description:
- Divide participants into small groups (two to three people).
- Ask a question on a domain of interest or an issue and invite each small group to come up with all possible ideas, definitions, or solutions they can think of. Provide them with paper and markers to write their ideas down.
- Invite the small groups to present the results of their efforts one by one and briefly in plenary, and to stand up and stick their contribution on the flipchart paper.
- Cluster the contributions and open up discussion within the group of learners on the proposed ideas.
- Benchmark the information collected to available definitions and concepts OR elaborate with the group on a possible solution based on the proposed ideas.
3-12-3 Brainstorming
Reference:
Gray, D., Brown S. and Macanufo, J. (2010). Gamestorming: A Playbook for Innovators, Rulebreakers, and Changemakers, p. 130-131.
The numbers 3-12-3 refer to the time allocated for the three passages of this activity. The short duration of this variation helps participants to avoid overthinking and fosters total group participation.
Number of learners: 2 to 20 (30 mins)
Duration: 30 minutes
Materials:
- Flipchart paper
- Markers
- Sticky notes
Description:
Ask your participants a question on a domain of interest or an issue.
- 3 minutes - Generation of a Pool of Aspect: for the first three minutes of the exercise, participants are asked to think about and write down, on separate sticky notes, as many characteristics of the topic at hand as possible. It may accelerate the group’s process to think in terms of “nouns and verbs” that come to mind when considering the subject.
- 12 minutes – Develop Concepts: Divide the group into pairs. Each team draws three cards randomly from the pool. The teams now have twelve minutes to develop a concept to present onto the larger group using the cards as food for thought. In developing concepts to present, teams may create sketches or visuals: the key is to prepare for a maximum three-minute long presentation of their concept to the group.
- 3 Minutes – Make presentations: Teams reveal the cards they drew and how the cards influenced their thinking as they present their concepts to the larger group. Time keeping is critical here: every team should have a maximum of three minutes to present their concept. After each team has presented, the entire group may reflect on what has emerged.
After presenting concepts back to the group, you can have your trainees do many different things, such as:
- Dig deeper on a singular concept.
- Integrate the ideas into each other for a final result.
- Vote on a concept they would like to develop further.
- Benchmark the concept obtained to existing definition—knowledge.
Brainwriting
Reference:
Dave Gray, Sunni Brown, James Macanufo (2010). Gamestorming: A Playbook for Innovators, Rulebreakers, and Changemakers, p. 78-79.
Brainwriting allows you to separate the generation of ideas and concepts from the discussion. It also fosters a more cooperative approach to sharing, ensuring the contribution of all participants, not just the most verbally dominant.
Through this process the group generates and shares ideas and then builds on them collectively.
Number of learners: 5 to 15
Duration: 30 - 45 minutes
Materials:
- Flipchart paper
- Markers
- Sticky notes
Description:
- In a space visible to all participants, write down the topic around which you need to generate or share ideas (accompanied by a drawing/visual support).
- Distributes paper to each trainee and ask them to silently write down their own ideas regarding the topic on separate pieces of paper.
- Once they complete an idea, ask the participants to pass their paper to the person on their right.
- Tell the trainees to read the card they received and think of it as an “idea stimulation” card. Ask them to add an idea inspired by what they just read or to enhance/further develop the information. Then ask them to pass it again to their right.
- Continue the process of brainwriting and passing papers to the right until there are various ideas on each card.
- Once finished, collect the cards and ask for help taping them on the wall around the paper with the topic on it.
- Have the group come to the wall to review ideas and knowledge. Ask them to draw stars next to the ones they find most compelling or complete.
- Have a group discussion.
After presenting concepts back to the group, you can have your trainees do many different things, such as:
- Dig deeper on a singular concept.
- Integrate the ideas into each other for a final result.
- Vote on a concept they would like to develop further.
- Benchmark the concept obtained to exiting definition—knowledge.
Online Brainstorming: Brain-netting
For brainstorming to happen remotely, it is crucial to have a central space online where team members can meet and collaborate (forum, cloud-based document storage or an online collaboration tool such as Google Drive).
You can adapt the different forms of brainstorming presented to a forum discussion followed by team work.
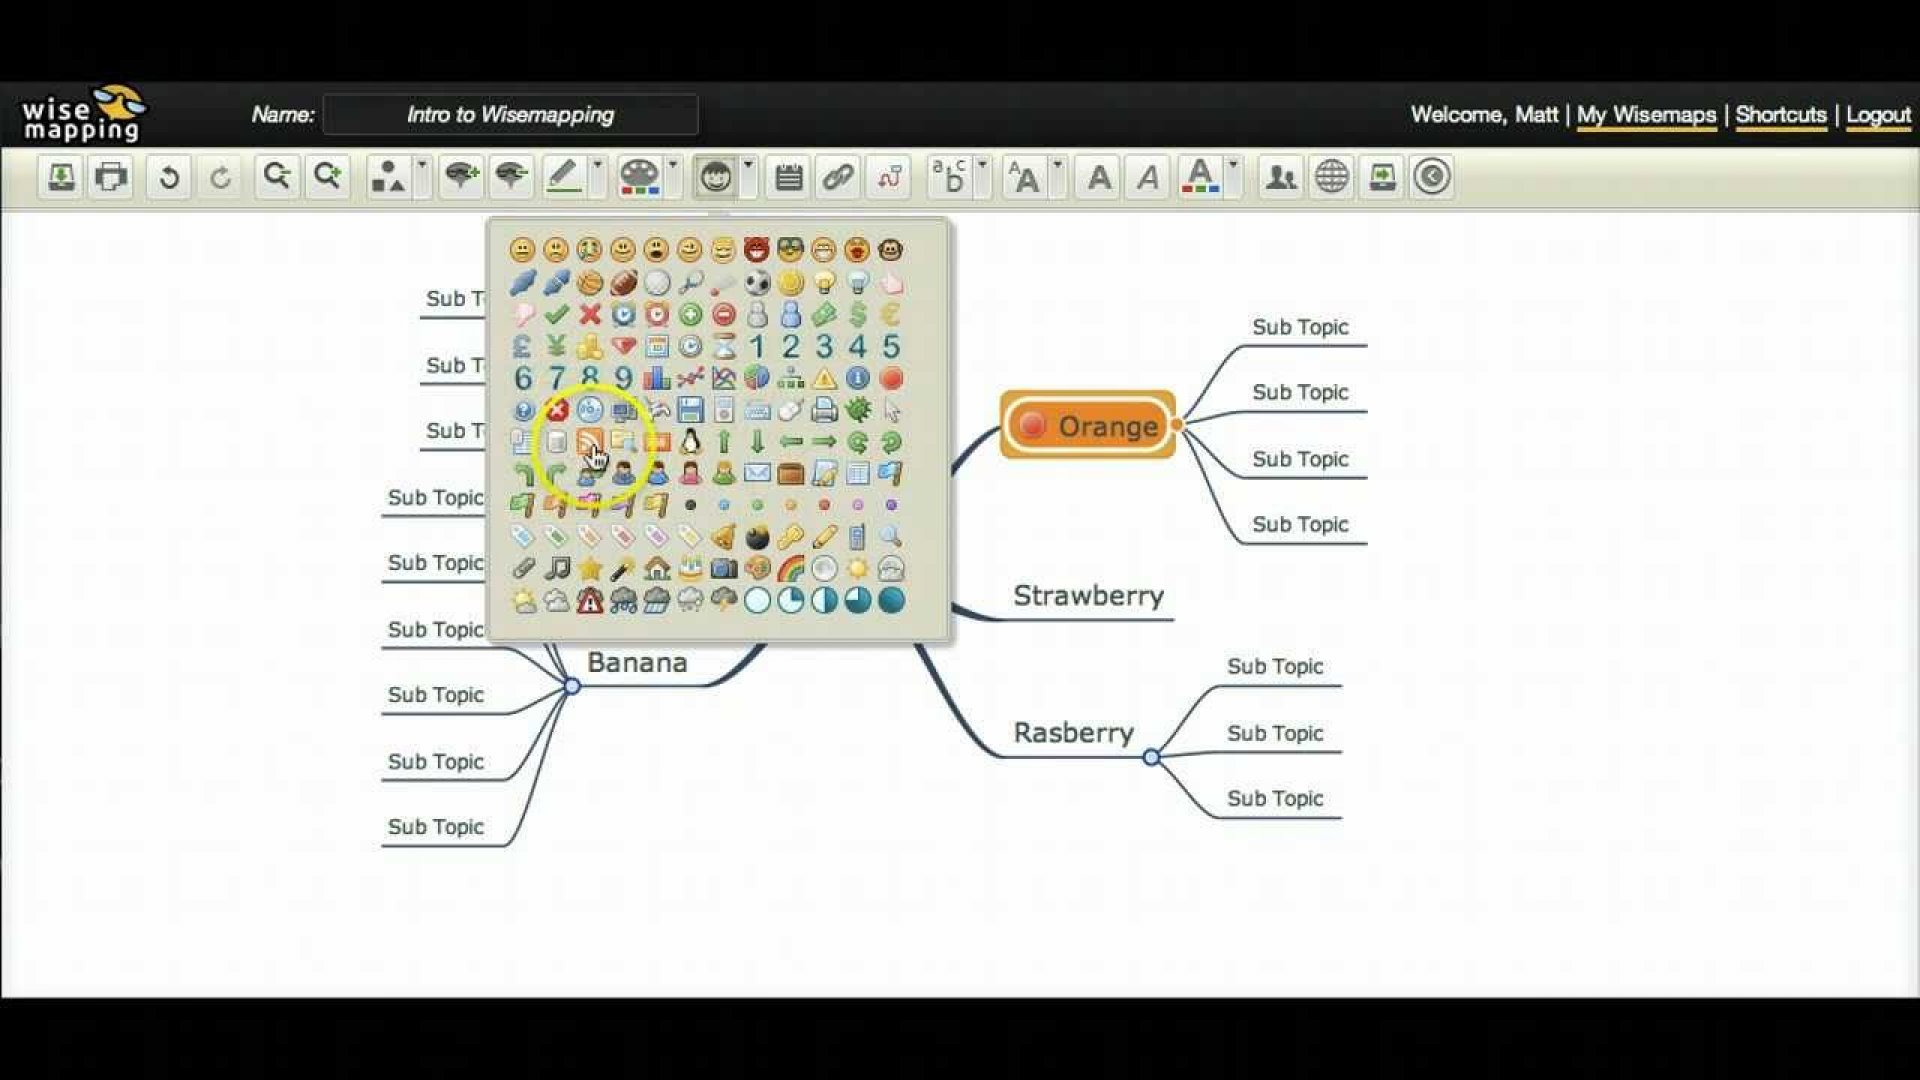
Furthermore, there a many great brainstorming tools that transform online brainstorming in a visual and collaborative experience, so you can use a brainstorming exercise with online mind-mapping toosl like:
Wisemapping is a web-based, collaborative tool. It allows teams and individuals to create mind maps and to develop ideas structurally.
Popplet is a tool to capture your thoughts and ideas. It's exceptionally visual and utilizes images and diagrams to build common understanding and overviews. Multiple people can access the same project within Popplet where they can build presentations. A mobile app is also available for iOS users.
Jigsaw
References:
Jigsaw Website
Jigsaw Teaching Strategy
The Jigsaw is a method of cooperative learning in which participants learn from each other. They are provided the opportunity to become experts in a particular subject and to share that knowledge with their peers.
How to and Why Use Jigsaw?
- To explore and enhance understanding of new concepts.
- To develop expert knowledge on a given concept.
- To integrate a collection of concepts into a common level of understanding.
- To give participants the control and responsibility of their own learning.
Option 1- Classic Jigshaw
How to Design and Facilitate a Jigsaw Classic Version Exercise?
Divide the content into a maximum of five to six segments/pieces.
Make sure the division is logical and it covers the whole topic you want to tackle within the activity.
Divide participants into five- or six-person jigsaw groups.
Try to ensure diversity within groups in terms of competencies, experience, gender, and background. You can either prepare the groups beforehand or have a more flexible approach and randomly divide people on the spot.
Assign one content segment to each participant
Provide them with resources connected to that segment (written materials, short videos, presentations, graphs, etc.)
Give participants time
They have to become familiar with the content they are responsible for.
Gather participants with others that are responsible for the same segment
In this way they can form “expert groups” in which they can support each other in understanding the content, in discussing the main points of their segment and in rehearsing the presentations they will make to their jigsaw group.
Bring participants back into their jigsaw groups
Back to the start
Ask each participant to present their segment to the group
Provide time for questions and clarifications
Float from group to group
Observing the process and supporting the participants and group dynamics.
Option 2 – Jigsaw Group Work Adapted Version
In the adapted version, the participants are divided into small groups, and each group is responsible for one segment of the content. They should understand it and present it to the other groups, facilitating their learning process in plenary.
How to Design and Facilitate a Jigsaw Group Work Adapted Exercise?
Divide the content into a maximum of five to six segments/pieces.
Make sure the division is logical and it covers the whole topic you want to tackle within the activity.
Divide participants into five or six jigsaw groups.
Try to ensure diversity within groups in terms of competencies, experience, gender, and background. You can either prepare the groups beforehand or have a more flexible approach and randomly divide people on the spot.
Assign one content segment to each group
Provide them with resources connected to that segment (written materials, short videos, presentations, graphs, etc.).
Give participants time
They can become familiar with the content they are responsible for.
Bring participants back into the plenary
Ask each small group to present their segment to everyone. Allocate time for questions and clarifications. You can also intervene if and when necessary.
Float from group to group
Observing the process and supporting the participants and group dynamics.
How to Use Jigsaw in the EBMOs Core Areas?
Based on the PPT of IN-HOUSE TRAINING ON: NEGOTIATION SKILLS FOR COLLECTIVE BARGAINING, NATIONAL HEALTH INSURANCE MANAGEMENT & TUGHE REPRESENTATIVES
Based on HANDLING EMPLOYEE GRIEVANCES, Federation of Kenya Employees
Based on IN-HOUSE TRAINING ON: OVERVIEW OF LABOUR LAWS FOR JTI OFFICIALS, Tanzania
Based on IN-HOUSE TRAINING ON: OVERVIEW OF LABOUR LAWS FOR JTI OFFICIALS, Tanzania
Case studies
Case studies use complex situations, either real or fictional, to foster learning. They place the learner in the position of problem solver.
The participants receive a description of a complex situation, a rich narrative and, based on the information provided, they are required to analyze it, explore relationships between events, identify options, evaluate choices, decide on courses of action and on ways to apply their acquired knowledge, skills and attitudes for an optimal approach. Participants become actively engaged in the situation and in discovering underlying issues, dilemmas and conflict issues.
References:
What is Teaching with the Case Method? Pedagogy in Action, The SERC Portal for Educators, https://serc.carleton.edu/sp/library/cases/what.html
Using case studies to teach, BU Center for teaching and learning, https://www.bu.edu/ctl/teaching-resources/using-case-studies-to-teach/

How to and why use case studies?
- To introduce new concepts and ideas.
- To give participants the opportunity to apply the knowledge skills and attitudes they have just learned.
- To explore different ways of approaching a situation.
- To support participants in strengthening knowledge, skills and attitudes by thinking about how to apply them in a certain context.
- You can combine individual analysis and reflection with group discussions in order to enhance learning results.
- You can use the same case at different moments in the learning flow in order to support participants in creating a more complex and comprehensive understanding of that particular situation and apply new techniques, tools and concepts. This enhances their awareness of the complex competencies needed to approach real-life situations in the work environment. It also makes them aware of the progress they are making, which is a great motivational factor for adult learners.
- You can use a case study as a pre-training assignment[1] . Participants will be invited to read it, as it will represent the basis of a group discussion conducted within the training.
- You can use a case study to evaluate and assess the level of competencies acquired by the participants.
Hyperlink to pre-training assignment methods

The discussion based on the case study can have different formats, from directive questions to open-ended discussions, individual analysis or small group work. Even role play [1] can support the learning process within a case-study.
Hyperlink to corresponding section
Some questions that can help you guide the learning process:
- What is the issue?
- What is the goal of the analysis?
- What is the context of the problem?
- What key facts should be considered?
- What alternatives are available to the decision-maker?
- What would you recommend—and why?
How to design a case study?
Possible elements to include:
- A description of the problem’s context (a law, an industry, a family).
- A main character that faces a question or problem that needs to be solved. This main character can even be the reader/participant.
- Supporting data, which can range from data tables to links to URLs, quoted statements or testimony, supporting documents, images, video, or audio.
Make sure the case study is relevant for the participants
The preparation of a case study requires expertise in the topic analyzed and also access to information from the real-work context of the trainees. Make sure you have both when building case studies for a certain training in order to ensure that they are relevant and meaningful for the trainees and their learning process.
Make sure that you include a lot of information
Avoid analysis or a conclusion.
Include information that has varying degrees of relevance
Including potentially irrelevant data in order to support participants in learning how to focus on the relevant
Present information in various forms
Informations that are correlated to real-life sources of information they would use in their workplace: stories, narratives, studies, tables, charts, quotes, graphs, etc. Make sure they are as realistic as possible and rich in their complexity.
Control the length and complexity of the case
Make sure it fits with the level of competencies within your group, answers to the learning objectives, and responds to the time-constraints you might have within the training. If you want people to read and analyze the cases at first sight within the training session, take into consideration how much time this will take and how this will affect the learning flow.
How to Use Case Studies in the EBMOs Core Areas?
Human Resources Management/Industrial Relations
Based on HANDLING EMPLOYEE GRIEVANCES, Federation of Kenya Employees (FKE Handlin Employee Grievances.pdf)
Based on The Role of Social Dialogue – FUE Uganda
Based on IN-HOUSE TRAINING ON: OVERVIEW OF LABOUR LAWS FOR JTI OFFICIALS, Tanzania
Based on IN-HOUSE TRAINING ON: OVERVIEW OF LABOUR LAWS FOR JTI OFFICIALS, Tanzania
Simulations and role plays
References:
Simulations, UNSW Sydney Teaching, https://teaching.unsw.edu.au/simulations
Role-Playing, Mind Tools – Essential skills for an excellent career, https://www.mindtools.com/CommSkll/RolePlaying.htm
Simulations and role-play are immersive methods in which participants pretend to be in a certain situation and behave accordingly. The participants are placed in a context created by the trainer and experience the reality of a given scenario while they are an active part of it, and extract learning from their own behavior, from observing others and analyzing what has happened. The situation feels real and thus creates a meaningful engagement of participants. Simulations and role-play have a non-linear nature, a certain degree of ambiguity, and are open-ended. This allows trainees to make decisions, to act and react, and ultimately to exercise effective and ineffective behaviors.

While in the simulation, people are themselves and act as themselves in a given situation, in a role-play they can play different characters and stakeholders in a given context. Sometimes not playing themselves but impersonating a role might be liberating for participants, as it takes off some of the performance anxiety. They can explore different approaches and allow themselves to make mistakes more easily when performing a role rather than when being themselves. Both role-play and simulations are effective in exploring and exercising skills and attitudes because they provide the opportunity for behavioral change and not only for discussion or observation. Sometimes these terms are used interchangeably as the line is not always that defined. Whatever the name, it is up to the trainer to decide which method and approach to use according to the learning objective, participant profile, and moment in the learning flow.
How to and why use simulations and role play?
- To explore effective and ineffective behaviors in a certain situation/ context.
- To understand current patterns and practices of addressing challenges.
- To explore the complexity and ambiguity of real-life situations.
- To explore and discuss different ways of addressing challenges.
- To exercise certain techniques, skills and attitudes.
- To prepare for specific, unfamiliar, or difficult situations that participants will meet in their work.
- You can also use simulation and role-play as an evaluation method to assess the level of competencies acquired by the participants.

How to Design and Facilitate a Simulation Role-play?
You will most likely not find a simulation/role-play that responds to the exact learning needs of your participants, so you will most likely need to build it.
Consider is the relevance of the role-play
Consider it in relation to the participants’ learning needs and professional context. Include the wider context but also enough details in order to make it feel real.
Define the purpose
Why do you do the role play/simulation?
Define roles
Incorporate the characters in the scenarios and provide enough information about them to support people in acting them out. Some of these may be people who have to deal with the situation when it actually happens (for example, managers). Others will represent people who are supportive or hostile, depending on the scenario (for example, a Union representative or an employee with a grievance).
Explain the role-play/simulation process
Make sure everyone understands the method. For people who have not experienced it before, it might be difficult to grasp what they need to do, so make sure you provide enough information and explanation. If needed and appropriate, you can perform a short demo of a role-play that is not linked to the current topic (to avoid bias).
Allocate the roles to different participants involved in the exercise
Invite them to use their imagination in order to try and understand the people they are playing: their goals, motivation, perspectives, even feelings when they enter and as they navigate the situation. If you facilitate a simulation and people are playing themselves, invite them to also reflect on these issues in order to expand their awareness on all the aspects involved. You can have individual or group roles, as it is most relevant for the size of the group and the learning objectives.
Allow participants time to prepare
People will need time to understand the situation, the characters they need to play, and to also prepare for their role. There are different ways to approach this phase: people can prepare together and explore different scenarios, they can prepare separately and meet only during the role-play.
Act out the scenario
Invite people to act out the situation, trying different approaches and exploring how they affect the other characters and the outcome of the situation.
Discuss the experience and learning outcomes
After the simulation/role-play always discuss with the group in order to reflect on their experience, build on their achievements, extract learning points and look at ways to use what they have learned in their jo
Some questions to support you:
- How was the experience?
- What has worked in terms of techniques, attitudes, and behaviors?
- What could you have done differently?
- What would you rather not do again?
Provide feedback
You as the trainer and expert can also provide feedback on their behavior. Remember to keep it positive and constructive, specific and always linked to their real-life work tasks and challenges. Focus on what people already do well (there is always something to highlight here), and what has worked. You can also include suggestions on what they can do more of or differently in the context of the competencies to be acquired.
How to Use Simulations and Role-play in the EBMOs Core Areas?
Based on the PPT of IN-HOUSE TRAINING ON: NEGOTIATION SKILLS FOR COLLECTIVE BARGAINING, NATIONAL HEALTH INSURANCE MANAGEMENT & TUGHE REPRESENTATIVES (Soft skills - Tanzania - ATE Negotiation skills PPT)
2.Human Resources Management/Industrial Relations
Based on HANDLING EMPLOYEE GRIEVANCES, Federation of Kenya Employees (FKE Handlin Employee Grievances.pdf)
Recap of Learning and Wrap-Up Activities
How and Why Use Recap Activities?
- Recap is an easy and fun way to reinforce the main learning points of a session/day.
- Allow learners to track their learning process.
- Recall the main learnings of the previous session/day before moving to the next.
- Provide repetition and foster the learning transfer.
- Emotional check-in with participants.
Team Quiz
- Split participants into groups (between five and ten participants per group).
- Inform them they are about to prepare for a team competition. They will review the content of the workshop and prepare five questions they think the other groups may not have the answer to. The winning team is the one that asks the most unanswered questions.
- Rules: participants cannot use their notes or mobile devises (just their memory); the team that asks a question needs to have the answer to that question; if two teams have the same question, no point will be given to either team.
What I Got from Today
Draw a large quadrant on a chart with the following four words: Know, Challenge, Change, and Feel. Ask each participant to do the same on an A4 sheet and fill in the quadrants by responding to these four (or similar versions of these four) questions:
- Know: What did you learn today that confirmed something you already knew?
- Challenge: What challenged you today?
- Change: What is one way you plan to change your work, based on today’s learning?
- Feel: How do you feel about what you learned here?
You can also invite participants to discuss their answers in small groups.
Pack Your Bags
Show participants an image of a suitcase and ask: “Of all the tools and ideas shared here, which three will you put in your suitcase and take back home with you?” Invite participants to share their answers with the group or write them on post-its and stick them to the image of the suitcase. Discuss the outcomes briefly.
Ticket Out the Door
If you need to have a quick recap of the day, ask for each person’s “ticket out the door”. This means to share one key thing learned during the session/day (and no repeats are allowed) that they’ll most immediately apply back on their job.
Smiley
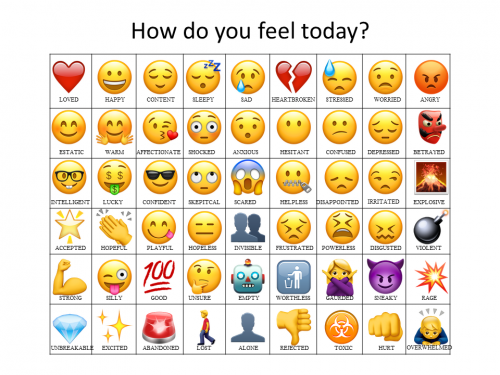
Explain that the aim of this activity is to have a check in with participants regarding how they are feeling. Give participants blank post-it notes. Draw three “Smiley” faces on the flipchart: one smiling, one crying, one neutral. Asks participants to draw one of these faces on the post it according to how they feel at the moment and write their name under it. Participants are then invited to stick their faces on the flipchart below the same face and share briefly why.
You can use as many different smiley faces or emoticons as you wish, get creative!
Reflection and Learning Transfer
Reference:
Broad, M. L., and Newstrom, J. W. (1992). Transfer of Training: Action-Packed Strategies to Ensure High Payoff from Training Investments. Boston, MA: Da Capo Press.
When we speak about learning transfer we mean, “the effective and continuing application by learners—to their performance of jobs or other individual, organizational, or community responsibilities—of knowledge and skills gained in the learning activities” (Broad, 1992). In a few words, the goal and the why of engaging in learning activities is: to know and to be able to do certain things in our life.
How To and Why Use Reflective Practices?
- To ask questions and gain clarity.
- To organize thoughts and map complex issues.
- To reflect upon and make sense of experiences and the processes.
- To connect personal and professional experiences to concepts and theories.
- To become aware of one’s strengths and areas of development.
- To develop self-awareness and analytical skills.
- To foster learners’ responsibility over own learning.
- To support the transfer of knowledge, skills and attitude.
Peer Support Groups
These are small groups of people that support each other in the learning process by sharing experiences, discussing challenges, and providing feedback and expertise on certain topics and competencies. You can create these groups at the beginning of the training and provide people with contexts to work together and reflect on their learning process (for example by providing space for an evaluation of the day within these groups at the end of each training day for fifteenminutes). You can leave it up to the participants to form them, or you can follow a certain structure and group people according to some significant characteristics (they may come from the same company, may have similar or different backgrounds and expertise, etc.). Peer support groups can also be very useful when you plan post-training assignments.
Reflection Groups
Reflection groups can help participants discuss their learning process and progress and ask questions and learn from each other’s experience. Furthermore, reflection groups create a space for trainees to provide feedback on the learning experience, share feelings and deepen relationships within the group.
They are the most effective when composed by a maximum of ten to fifteen people and facilitated by a trainer. You may let the trainees split into subgroups themselves or opt to organize them based on similar backgrounds in order to foster reflection on how they could use the elements of the program in their specific work or with their specific target group. Reflection groups must meet regularly throughout the learning experience (e.g. every day before the closing). You can provide them with guiding questions (“What was one learning point of today?”, “What could be improved?”, “What would you like to learn more about?”) or let the conversation unfold freely. Especially at the beginning, a question or a simple evaluation technique may help spark conversation.
It is also possible to have the trainees self-facilitate their reflection groups. In this case, make sure the goal of the meeting is clear and ask one participant to present a brief report to you at the end of the session. This allows you to understand a participants’ feedback and adjust the learning experience, even if not directly facilitating the reflection sessions.
Possible questions for reflection on learning
What were the three most important things you learned from this session/training?
What competencies do you feel you have developed in relation to the training topic?
What knowledge/skills/attitudes do you feel you have acquired in relation to the training topic?
Which were the most relevant training sessions/moments for you? Please tell us why.
What would you change in the training to make it more useful?
From what you learned, what do you plan to apply back at your job?
What kind of help might you need in order to apply what you learned?
What barriers do you anticipate you might encounter as you attempt to put these new skills into practice?
What ideas do you have for overcoming the barriers you mentioned?
How would you hope to change your practice after this training?
Learning Journal
Overall learning objectives of the training activity
Get Ready for it and Keep it Going
Pre-training Assignments
You can start the learning process before meeting with the participants. If possible, you could give them small pre-training assignments to get them in the right mindset for the training itself. As you well know, people are really busy, and your objective is not to burden them with this assignment. Consider it like an appetizer for the training, a common story the participants start to write even before getting together as a group.
Self-Assessment and Learning Needs
Communicate the training topic, learning objective, and subjects covered to participants. Invite participants to reflect on their present competencies in relation to the training content.
- What knowledge and competencies do they already have?
- What concepts are they already familiar with?
- What are they interested in finding out or in developing?
- What do they feel is essential for them to learn in order to perform in their current position in relation to the topic of the course?
This is an individual process, so participants will not need to respond. Invite them to think about these questions, to try and find an answer, and then communicate that you will share the outcomes in the first day of training in the opening session. Make sure that you allocate time for this discussion in the first session of the course.
The List of Questions
Invite participants to read through the course information (objectives, agenda, description, etc.) and to write down all the questions that come to their mind in relation to it. In order to stimulate a deeper analysis, ask participants to come up with at least ten questions and to share these questions with you via email before the training. This will support their learning and will also give you an opportunity to make sure people get their questions answered during the training.
During the course, invite participants to keep these questions in sight and complete the list with more questions if they come up or to jot down answers when they are clarified within the training. You can also allocate some time toward the end of the training to address these questions: it does not mean you have to answer them. You can invite people to answer each other’s questions, or participants can answer their own questions, or actively look for answers. This will enhance learning and will also support their awareness for progress made.
Practice Analysis
Invite participants to analyze their practice in relation to the theme of the training.
- How much are they doing already?
- Do they have a particular case/situation that they would like to discuss within the training in order to receive support from their colleagues?
- Do they have a best practice example?
- What are the specificities of their practice in relation to the training theme?
- What is their experience?
Ensure within the training some time for people to share these findings. It is an effective method to get people engaged even before the training, to increase relevance in relation to their professional context, and also to value the people with more experience in the field.
Case Studies
You can send a case study to the participants before the training. They will be invited to read it, as it will represent the basis of a group discussion conducted within the training.
Post-Training Assignments
For your participants, the training is not the end, but the beginning of applying what they have learned in their workplace. You can enhance their learning process and support them to apply what they learned when back in the workplace (and thus, increase the quality and effectiveness of the training you delivered) by following up with them in the weeks and months after the training. It can take some additional time and effort, but it will surely be worth it. Here are some ideas on how to do it.
Peer Support Groups
These are groups of three to four people that support each other in the learning process by sharing experiences, discussing challenges, and providing feedback and expertise on certain topics and competencies. You can create these groups at the beginning of the training and provide people with contexts to work together and reflect on their learning process (for example by providing space for an evaluation of the day within these groups at the end of each training day for fifteen minutes). You can leave it up to the participants to form them, or you can follow a certain structure and group people according to some significant characteristics (they may come from the same company, may have similar or different backgrounds and expertise, etc.). Choose the method you find most suitable for a particular group and training.
After the training is over, invite these groups to meet (online or in person) once a week for at least four weeks in a row to discuss and reflect on the process of how to apply their newly acquired competencies within their jobs. You can provide them with some guiding questions:
- What have you used this week from what we learned within the training? How did you use that knowledge/skill/attitude?
- What are you so satisfied with related to the topic that you would continue doing?
- What do you feel you still need to develop?
- What do you foresee using next week from what we learned within the training?
You can go further and request that participants post or share a short summary of their discussion with the whole group. This supports them to take more responsibility with the peer-support groups and it provides the chance to understand how everyone else is doing.
Case studies
You can send a case study to the participants every week for a month after the training has finished. Then you can ask them to share via email (or any agreed communication method) their thoughts, ideas, or suggested courses for action. The objective is to foster dialogue between themselves and not to evaluate or give feedback to them on their responses. A Facebook group could be a useful platform, as can be videos, articles, and other real-life cases to stir up the discussion.
Prediction
Ask participants during the training to predict what skills, information, techniques, and attitudes they will most likely use in their workplace and how. In the weeks following the training, ask them to monitor these predictions and invite them to share which ones they are actually using (this can be done in the peer-groups mentioned above, or by any other communication means mutually agreed upon: WhatsApp, Facebook, email).
Commitment
At the end of the training ask participants to commit to one to three actions of learning transfer to their jobs. Invite them to self-monitor how the process is going in the weeks following the training and share with their colleagues. This can be done in the peer-groups mentioned above, or by any other communication means mutually agreed upon: WhatsApp, Facebook, email.
Learning Journals
A learning journal is a collection of notes, observations, thoughts, and other relevant materials built‐up over a period of time as a result of a period of learning and/or working experience. Its purpose is to enhance people’s learning through the process of reflecting on one’s learning experiences.
You can invite participants to fill in a learning journal in relation to the topic of the training. You can provide some supporting questions within the training and include instructions on how to continue journaling even after the training has finished.
Supporting questions for a learning journal in a graphic format:
During the training
- What are the key learning outcomes from today’s training sessions/from the training?
- Knowledge
- Skills
- Attitudes
- Behaviors
- What are the questions that accompany that learning?
- How can you apply these learning outcomes to your professional context?
- How do you plan to use what you have learned within the training in your job?
- How do you plan to continue the learning process started here?
- What do you still need to learn? How can you do that?
After the training
- What techniques, knowledge, attitudes or skills acquired within the training have you used this week?
- What are you so satisfied with related to the topic that you would continue doing?
- What is difficult in applying?
- What do you feel comfortable with?
- What do you feel you still need to develop? How can you do that?
- What do you foresee using next week from what we have learned within the training?
Technologies to Enhance Learning
Integrating Social Media Platforms and Communication Apps
Reference: https://compass.itcilo.org/methodology/social-networking/
Social networking connects individuals or organizations around similarities. Communication technology, such as WhatsApp, allows for group chats and open communication between many parties. Group pages or chats can be used to connect the trainees, create a positive group dynamic, and offer a space for peer-support. They can be used by the facilitator to share content, tasks, and evaluation tools. Furthermore, they can be used as platforms for remote group work and group discussions.
Their role can be central in pre-training assignments and post-training assignments, when participants are not meeting face-to-face or do not have another learning platform where to connect and engage.
When to Use It
- Publish or share tasks, content, or evaluation tools.
- Promote learning activities and provide knowledge in context.
- Form communities of practice to discuss issues and collaborate.
- Build a participant network, establish professional connections and utilize an expert network.
- Carry out group work or group discussions remotely.
Make sure to set clear limits in the use of such applications with strict rules regarding posting/messaging time. Especially when referring to communication tools such as WhatsApp. Make sure no interactions take place during free time (e.g. evening) and resting time (e.g. weekends and bank holidays).
How to Apply It
- Make sure all your trainees can and are willing to use the platform/communication technology chosen.
- Build group dynamics through participant introductions or pre-event dialogue.
- Make sure you are familiar and confident with the platform/ communication technology.
- Share best practices and course material.
- Foster a sense of community around your activity theme.
- Announce future learning activities or deadlines.
- Share evaluation tools for participants to fill them in.
- Share post-training assignment and share results.
Tools
WhatsApp
Reference
Gon, S. and Rawekar, A. (2017). Effectivity of E-Learning through Whatsapp as a Teaching Learning Tool, MVP Journal of Medical Sciences, Vol 4(1), 19–25, January-June 2017, DOI: 10.18311/mvpjms/2017/v4i1/8454
WhatsApp is messenger app that can have major implications on pedagogies. WhatsApp enhances the facilitator’s availability and interaction with the learners, fosters interaction between students, and makes it easy to share learning material and have group discussions. It allows direct access to many online resources and fosters students’ creativity, autonomy, and responsibility for their own learning. WhatsApp includes the following collaborative features:
- Video, text messaging, image, and voice note sharing
- Group Chats of up to fifty group members
- Unlimited Messaging
How to Apply It:
- Use the Group Chats feature to create learning and study groups.
- Use the Group Chats to foster interaction and engagement between trainees.
- Create and share audio lessons that can be sent directly to students.
- Stay in contact with students outside the classroom and use it to facilitate real-time communication between trainees and facilitator.
- Send out problems or assignments to students even when they are not in class.
- Share course material.
- Use the Group Chat to invite participants to carry out group tasks or discussions.
Make sure to set clear limits in the use of such a pervasive communication app. Set strict rules regarding posting/messaging time, making sure no interaction takes place during free time (e.g. evening) and resting time (e.g. weekends and bank holidays), and that participants are not overwhelmed with a flow of irrelevant messages.
Facebook
With over 2.45 billion monthly active users, Facebook is the largest social network and therefore represents plenty of opportunities to build and maintain a network of colleagues and participants from all over the world. This free global system cannot be overlooked for its potential for social learning, building communities, and sharing resources, especially now that the feature, Learning Unit, can be used to for learning and teaching in Facebook Groups.
How to Use It:
- Use a separate account for professional roles.
- Communicate with your network by writing status updates, writing on their walls, sending private messages and chatting.
- Share resources by posting photos, videos, events and links.
- Create a group page for the participants in your learning activity.
- Share links on the group page to relevant resources and websites that pertain to the learning activity, event or general theme.
- Use the Learning Units feature to teach in your Facebook group page
- Invite participants to interact with one another and share their experiences.
- Invite participants to give feedback on their learning process and/or satisfaction with the learning offer.
- Send reminders about upcoming activities, events or any other related news.
Where to learn more:
The Facebook Guidebook by Mashable
Use Facebook for Professional Networking
How to Teach in Facebook Groups
Use Your Facebook Group as a Learning Platform (for Training or an Online Course)
LinkedIn
LinkedIn is the world's largest online professional social networking site. Widely used, its goal is to connect its members on the professional level. It is used by job seekers to expand their network and increase their visibility, and by recruiters looking for professional profiles.
LinkedIn offers an integrated learning platform with a vast variety of online courses and microlearning opportunities.
How to Use It:
- Share information about your organization and learning offers.
- Follow targeted organizations to keep up-to-date with key developments and who has recently joined, left, etc. so you can identify new possible targets for participation in your activities.
- Invite participants to engage by answering/asking questions in professional online groups relevant to the course theme (use the Group Directory to find existing groups).
- Create a group and use it for sharing best practices amongst participants.
- Share presentations on LinkedIn with Slideshare or using Polls—a market research tool to collect data from your connections. This could be useful as a learning needs assessment when creating or updating your learning activities.
Where to Learn More:
This will help you get started, set up your profile page with your photo and summary paragraph and quickly identify all your contacts in order to build your network.

Communities of Practice
Online communities provide a more “focused environment” to network, validate and build on existing knowledge and good practices. Many online communities have been set up for professional or interest groups. They often have full social networking functionality such as profiling, message posting, discussion forums and online chat.
How to Use It:
- Use an online platform such as Ning (www.ning.com) to set up an online community around an online or blended learning activity.
- Join online communities on relevant topics here
- Invite participants to Join online communities on relevant topics here
Where to Learn More:
Etienne Wenger: Cultivating a Community of Practice: A quick start-up guide
Presentation Tools
Reference
https://compass.itcilo.org/methodology/presentations/
When we think about presentations we immediately think Powerpoint. Powerpoint is one of many visual aids that can support, supplement and reinforce what the speaker says, but there are many more!
Check them out!
When to use it:
- Support, supplement and reinforce the narration
- Stimulate the audience’s attention and add interactivity through images, audio and video
- Reach large groups of people
Do NOT use it for presenting documents or to communicate text-based information.
Tools
Prezi
Prezi is a tool to make your presentations more dynamic and visually engaging. It allows the navigation through different objects by moving, zooming and rotating the view, illustrating the relationship of one concept to another. You can download it and use it offline. Because it is also stored online, multiple users can collaborate on it simultaneously.
Audience Response System
When to Use It
- Facilitate interaction and engagement during training sessions and presentations.
- Continuous course improvement and feedback.
- Check for prior knowledge and identify participants’ knowledge gaps.
- Help participants learn about each other and to remind them to respect diversity.
- Check understanding after a learning activity or review concepts from the previous day.
- Generate discussion and engage all participants (you can see the number of responses clicked).
How to Apply It
- Test the system in the proposed location for technical issues.
- Provide clear instructions on how to use the clickers.
- Consider the length of your questions and offer three to five choices of answers.
- Limit the number of questions. Focus on key concepts.
- Ask the questions at periodic intervals.
- Allow time for participants to answer (15-20 seconds for groups of less than thirty and 1 min for groups of over 100).
- Encourage discussion between questions.
Tools
Slido
Slido is an easy-to-use Q&A and polling platform for meetings and trainings. Participants can join the conversation, through an event code. Slido allows you to crowdsource questions from your audience, run live polls and brainstorm ideas. It is very visual and easy to use.
Mentimiter
The web-based tool focuses on online collaboration and allows students to answer questions anonymously. Extremely visual, it enables users to share knowledge and real-time feedback though mobile or pc-mobile with presentations, polls or brainstorming sessions in any group activity.
5 Ways to use Mentimeter to Engage and Interact with Students
Padlet
Padlet is a digital discussion board which allows discussions to be posted on the ‘digital board’ with a colorful sticky note. The facilitator can share learning materials with students and ask them for their reasoning and opinions. Student responses are also color coded to easily match the answer to the question. Students can create boards for learning a concept together via Padlet.
AnswerGarden
This is a minimalistic and effective feedback tool. Use it to have real-time feedback or as a creative brainstorming tool. You can post your question in a tweet or you can embed it on a website or blog to use it as a poll.
Hungry for more tools? Click here.
Assessment tools
Online tools can be extremely helpful when it comes to mapping, monitoring, assessing and evaluating the learning needs, acquired competencies and quality of the learning experience. They can be used in the first stage of the learning management cycle—to assess the learning needs our learning offer will respond to—as well as during the learning experience—to monitor and evaluate learners progress and satisfaction—and after the training—to gain an overview and evaluation. They allow us also to receive feedback to further improve our learning offer.
When to use it:
- Assessment of the learning needs assessment in early stages.
- Monitoring and evaluation of the trainees’ progress and understanding.
- Monitoring of the learners’ satisfaction with the learning experience.
- Assessment of the overall impact and satisfaction with the training experience.
- To receive feedback on how to improve our learning offer.
Tools
Google Forms
Google Forms is a tool that collects information via a personalized survey or quiz. The information is then collected and automatically connected to a spreadsheet. It is visually pleasant and very simple to use. You can create your learning needs assessment questionnaire or evaluate the learning experience here. The questionnaire can be shared through a link by email, message or post.
SurveyMonkey
SurveyMonkey is a tool that allows you to launch any kind of online survey. It is an easy-to-use platform and allows you to tailor your surveys according to your defined target audience.
You can create your learning needs assessment questionnaire or evaluate the learning experience here. The questionnaire can be shared through a link by email and message.
Design Sample
Part III - MANAGERIAL AND SOFT SKILLS
Design based on the PPT of IN-HOUSE TRAINING ON: NEGOTIATION SKILLS FOR COLLECTIVE BARGAINING; NATIONAL HEALTH INSURANCE MANAGEMENT & TUGHE REPRESENTATIVES
(Soft skills - Tanzania - ATE Negotiation skills PPT)